Using AUTOPAC
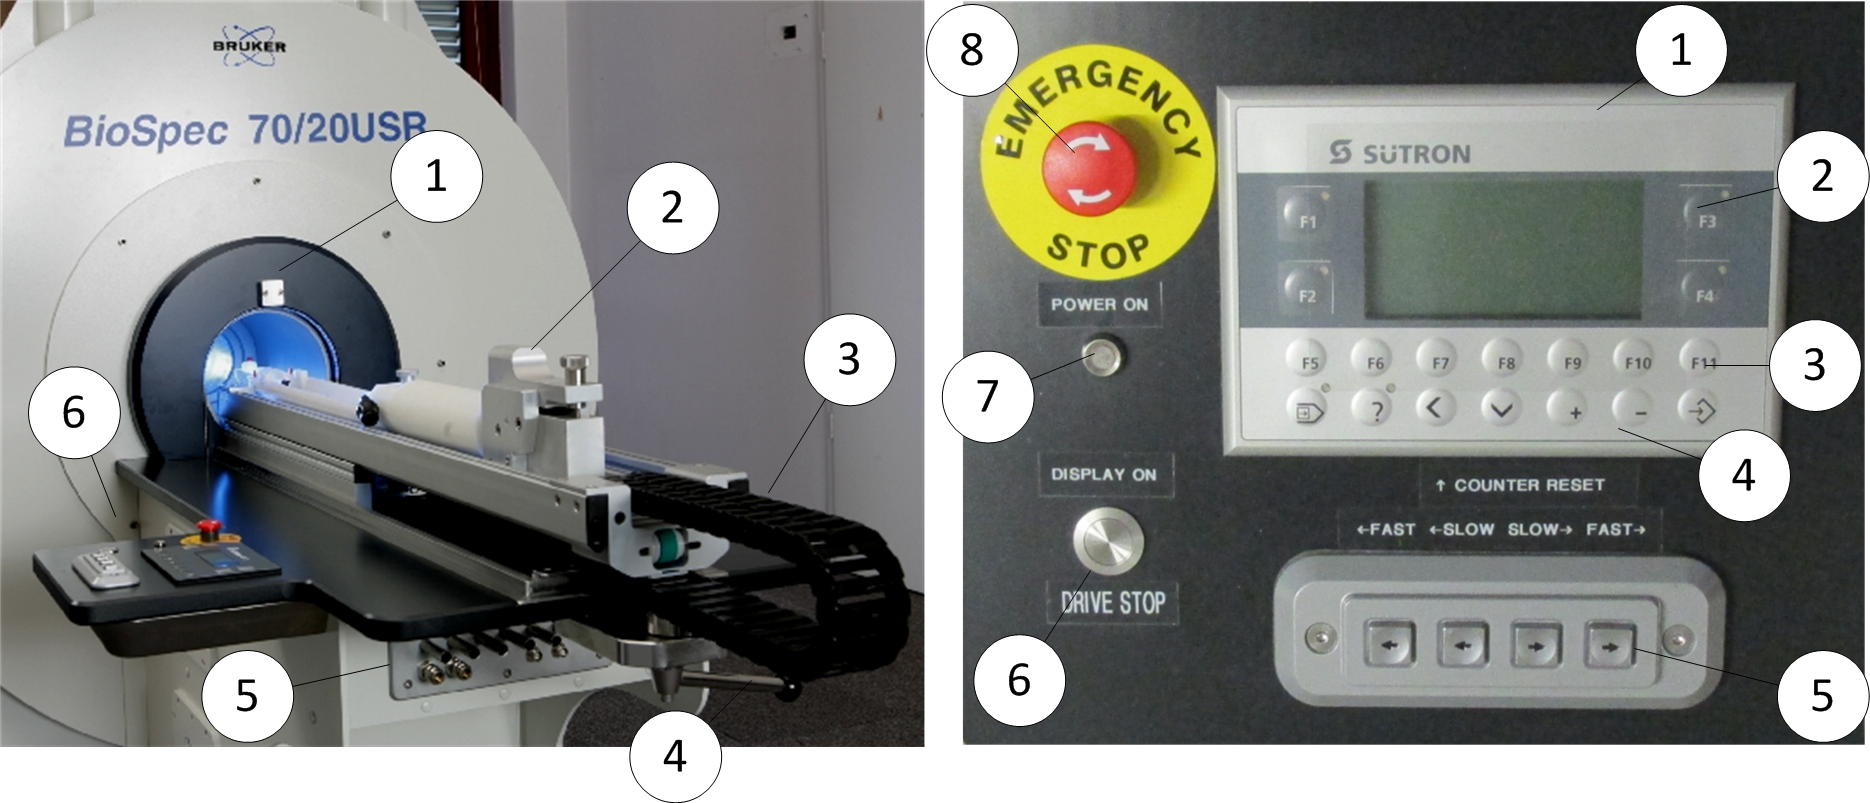
The AUTOPAC is an automatic animal positioning system. In combination with different animal beds, it is used to position the animal as desired within the magnet. The AUTOPAC is operated using the control panel on the preparation table:
AUTOPAC (on the left) with control panel (on the right)
Function keys:
Manual drive buttons:
Configuration and Service keys have different meanings depending on the service mode. The most important ones for the user regarding possible trouble shooting are listed below. Please refer also to the technical documentation of the MR instrument.
The AUTOPAC provides the following functionality:
- ▪
- Height adjustment: The height of animal beds is set using the screw (2). Turning the screw clockwise to move the bed upwards. Carefully adjust the height of the bed to avoid that the animal and/or the receive coils touch the volume coil in the magnet.
- ▪
- Positioning of the animal in the center of the magnet is done by the following steps:
- ➢
- Prerequisite: Zero position has been initialized with F1.
- 1.
- Turn the Laser on by pressing the function key F2.
- 2.
- Move the animal under the laser cross hair in the desired position using the manual drive buttons (inner buttons: slow movement, outer buttons: fast movement).
- 3.
- Turn the laser off by pressing function key F2.
- 4.
- Press F3 to move the animal automatically into the magnet center.
- 5.
- Observe carefully to move the animal in a safe manner.
- 6.
- Remove the animal out of the magnet using the function keys F1 or F4.
- ▪
- Setting a Reference position. In some cases it might be useful to set a certain animal position as a temporal reference position, i.e. in order to make small position changes based on this position. This is facilitated by setting the actual position counter to zero. After nulling the position, the relative distance (label R) is displayed with respect to the new reference position. The actual position remains unchanged (label A).
- ▪
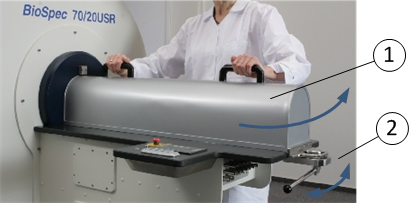
- RF screening is achieved by placing the AUTOPAC cover (1) and by locking it with the handle (2). The display turns off as soon as the cover is locked.
Press the DISPLAY ON button to switch the display on, refer to position no. (6) in the figure shown before.
AUTOPAC RF screening
- ▪
- Collision protection: In order to protect the operator and the animal from being injured or hardware from being damaged, a safety measure – a so-call collision protection – is performed. If a collision is detected, the drive motor stops immediately. Before you reset the protection, always make sure that the reason for triggering the collision protection is solved. Press the »Emergency Stop« button to clear the error state, refer to position no. (8) in the figure shown before. You can change the threshold of the collision protection using the »Motor Force« Service key between 0 (low threshold) and 25 (high threshold).
After a collision protection stop has occurred, the actual position of the sled might be undefined. Press F1 to drive the sled completely out to initialize the position.
- ▪
- RF filtered feed through: The cables for animal supervision and the anesthesia gas tubes must always be lead through the AUTOPAC filter plate. For the installation of new signal lines, proceed as follows:
- 1.
- Drive the empty sled all way into the magnet.
- 2.
- Remove the filter plate with a non-magnetic Allen key (size 4).
- 3.
- Push all cables, tubes, fiber optics into the crawler (1) and grab them from the opening of the filter plate. Pull all cables through the front opening of the filter plate (2).
- 4.
- Use the appropriate feed-through and filter of the filter plate to connect tubes, cables, etc.
- 5.
- Mount the filter plate.
- 6.
- Place all cables, tubes, fiber optic cables carefully in the crawler (3). Close the crawler.


