Using MANPAC
The MANPAC is a manual animal positioning system. In combination with different animal beds, it is used to position the animal as desired within the magnet. MANPAC is operated manually.
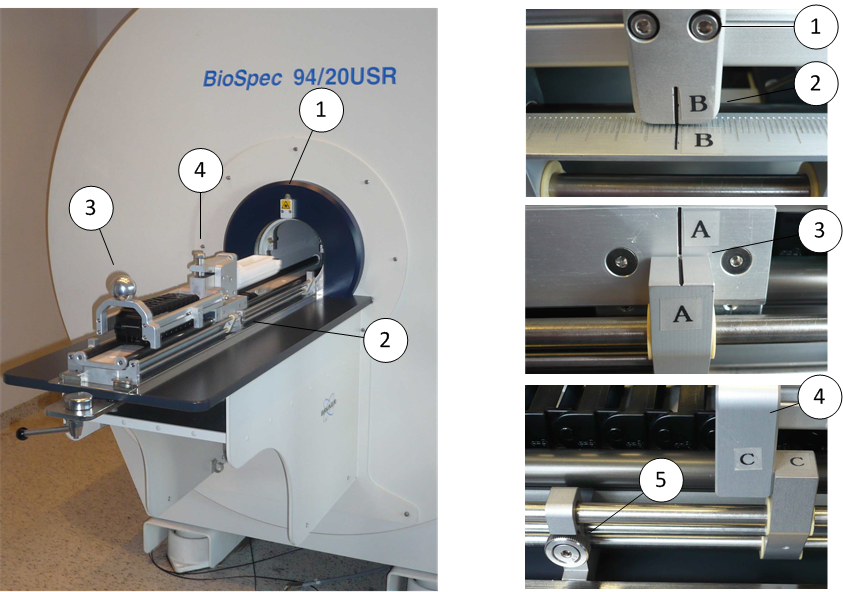
MANPAC (on the left) with sliding system (on the right)
The MANPAC provides the following functionality:
- ▪
- Height adjustment: The height of the animal beds is set using the screw (4). Turning the screw clockwise to move the bed upwards. Carefully adjust the height of the bed to avoid that the animal and/or the receive coils touch the volume coil in the magnet.
- ▪
- Positioning of the animal in the center of the magnet is done by the following steps:
- 1.
- Activate the Laser by pressing the button on top of the laser.
- ⇨
- The light will remain on for approx. 20 s.
- 2.
- Move the animal under the cross hair until the crosshair indicates the desired region of interest.
- 3.
- Open the adjustment screw (5) on the right side and move the marker A (3) until it co-aligns with its partner mark. Close the adjustment screw gently.
- 4.
- Move the animal bed inside the magnet until the mark B co-aligns with the partner mark. The region of interest is now in the center of the magnet. Pay attention that the animal bed doesn’t touch or block while it is moved inside the magnet.
- ▪
- FIX position: Sometimes, it is desired to take the sample out and bring it back into exactly the same position. This can be achieved using the FIX position block C (4). Losen the adjustment screw (5) and move it against the FIX block counterpart. Close the adjustment screw (5) again. The next time the sample is inserted into the magnet, it will always come back to the identical position. Please notice, release the fix block position, when it is no longer required.
- ▪
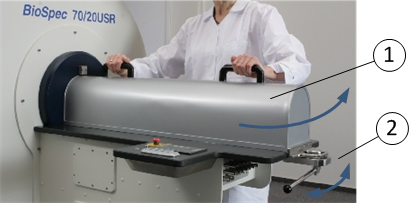
- RF screening is achieved by placing the MANPAC cover (1) and by locking it with the handle (2).
MANPAC HF-Screening
- ▪
- RF filtered feed through of animal supervision and anesthesia gases must always be lead through the MANPAC filter plate. For the installation of new signal lines, proceed as follows:
- 1.
- Drive the empty sled all way into the magnet.
- 2.
- Remove the filter plate with an non-magnetic Allen key (size 4).
- 3.
- Push all cables, tubes, fiber optics into the crawler and grab them from the opening of the filter plate. Pull all cables through the opening of the filter plate (2).
- 4.
- Use the appropriate feed-through and filter of the filter plate to connect tubes, cables, etc.
- 5.
- Mount the filter plate.
- 6.
- Place all cables, tubes, fiber optic cables carefully in the crawler (3). Close the crawler.
- ▪
- Calibration of the CENTER Position: The CENTER position is calibrated before installation. Proceed as follows:
- 1.
- Place a small MRI sample under the laser cross hair and align the A marker.
- 2.
- Move the sample into the magnet and verify the central positioning for instance by a suitable imaging experiment. Move the animal bed such that the sample is precisely in the center of the magnet.
- 3.
- Losen the two center position screws (1) and move the reference block such that the two B marks co-align. Close the two center adjustment screws.
- ⇨
- The MANPAC is now correctly calibrated.
The batteries of the laser are located under the table of the MANPAC, close to the filter plate. To exchange them, unscrew the battery housing and replace them with 3 batteries of type AAA.


