User Tools

Site Tools


informatica:hp_z400_macromodel_macromodel

Schrödinger Suite 2012

La Schrödinger Suite 2012 és el paquet de programes que inclou els programes Macromodel i Maestro, a més d'altres.

Les icones emprades indiquen,

  • :info: - informació important per la instal·lació o configuració
  • :ok: - pas d'instal·lació o configuració completat
  • :warn: - pas d'instal·lació o configuració parcialment no completat, o que potser s'haurà de modificar posteriorment.
  • :fail: - pas d'instal·lació o configuració no completat

Descàrrega del programa

Descarrego el programa (:info: 3,6 GiB!) del lloc web de Schrödinger. Un cop descarregat, el descomprimeixo. Això crea la carpeta Schrodinger_Suite2012_Linux-x86_64_NonCommercial on, entre altres, hi ha,

  • el fitxer amb les instruccions d'instal·lació,
  • els scripts de comprovació del sistema (per exemple, platform), i
  • el script d'instal·lació INSTALL.

Instruccions breus

Aquests són els passos esmentats a la Installation Guide. Schrödinger Suite 2012 per instal·lar els programes,

This is a summary of the installation process. For detailed instructions, see the page number provided in each step.

  1. Check this guide for:
    • System requirements (page 5)
    • Disk space requirements (page 9)
    • Maestro requirements (page 9)
    • Product-specific installation information (page 11)
  2. Mount the DVD (page 17) or download the software from the Schrödinger Support Center. If you download the software, extract the downloaded tar file: tar xvf Schrodinger_Internet_Download.tar
  3. Run the platform script to verify that your machine meets the system requirements (page 18).
    • Run the INSTALL script to install the products (page 19).
    • Set the SCHRODINGER and DISPLAY environment variables (page 23).
    • Obtain a license for the products:
      • Obtain machine information (page 60).
      • Request a license (page 62).
      • Install the license (page 64).
  4. Optional: Substitute run-time libraries (page 25).
  5. Test the Maestro installation by typing $SCHRODINGER/maestro (page 23).

If jobs will be run on remote hosts:

  1. Set up the hosts file (page 73).
  2. Set up communication between hosts, if not already done (page 82).
  3. Optional: Prepare for Batch Queue Submission (page 87).
  4. Test the installation and communications (page 106).

Comprovacions prèvies a la instal·lació

System requirements

  • :ok: CPU, Memory, and Disk. En general el sistema compleix amb les especificacions recomanades.
  • :warn: Scratch disk. El disc actual té una velocitat de 7200 rmp, si féssim un ús intensiu de l'ordinador per càlculs caldria considerar la possibilitat d'instal·lar un disc addicional, potser d'estat sòlid (SSD), per millorar la velocitat del scratch disk.
  • :warn: Memòria. Per ara hi ha 6 GiB de memòria repartits en tres DIMM de 2 GiB instal·lats als bancs 0, 2 i 4 (comanda lshw -class memory). Segons quin sigui l'ús que fem de l'ordinador i la complexitat dels càlculs, caldrà ampliar la memòria per minimitzar l'ús de la memòria virtual en disc.
  • :warn: Targeta gràfica. Compleix amb les especificacions recomandas. Cal però, comprovar els controladors (drivers) i actualitzar-los si cal. Aquesta targeta no permet l'ús de CUDA amb aplicacions preparades per GPGPU.
  • Programari,
    • :ok: Perl version no earlier than 5.004 (“perl –version” diu This is perl, v5.10.1 (*) built for x86_64-linux-gnu-thread-multi).
    • :ok: gunzip
    • :ok: Python 3.0 (32-bit). Cal actualitzar la versió (“python –version” diu Python 2.6.6) disponible a Debian 6.0.5 (squeeze). Instal·lo els paquets python3, python3-minimal i python3.1-minimal; potser caldrà instal·lar altres paquets addicionals.
  • :ok: Targeta de xarxa
    • :warn: Cal modificar la configuració de xarxa a estàtica per evitar problemes si la xarxa es penja. De totes formes, com que l'ordinador estarà a la xarxa interna del SeRMN, on aquesta és la configuració estàndard.

GNU/Linux x86 64-bit executables

:info: La distribució Debian no és una de les que tenen suport tècnic. Tanmateix, per la seva proximitat i estreta relació amb la distribució Ubuntu, seguiré les recomanacions per aquesta distribució.

  • :ok: NFS file locking must be enabled. El paquet nfs-common està instal·lat i hauria de ser suficient. Si cal, es pot instal·lar el paquet nfs-kernel-server.
  • :ok: glibc version must be at least 2.5. La versió disponible és la 2.11.3-3.
  • :ok: On Ubuntu, the lsb subsystem and the mesa-utils must be installed. El paquet mesa-utils (v. 7.7.1-5) ja està instal·lat. Instal·lo el paquet lsb-core (v. 3.2-23.2squeeze1) i aquest arrossega i instal·la 34 paquets de programes addicionals necessaris per compilar codi font.
  • :ok: On Ubuntu, symbolic links to the the libssl and libcrypto libraries must be made because of versioning differences (cd /usr/lib && ln -s libssl.so.0.9.8 libssl.so.6 && ln -s libcrypto.so.0.9.8 libcrypto.so.6).

Queueing Systems

Aquests són els gestors de cues amb què poden treballar els programes de la Schrödinger Suite. Indico quins paquets de Debian semblen correspondre al gestor de cues. En alguns casos la correspondència és clara, en altres caldrà comprovar-la.

  • :info: PBS, including PBS Pro. El paquet globus-gram-job-manager-setup-pbs sembla correspondre's amb aquest gestor de cues.
  • :info: Grid Engine, including SGE and GE. Hi ha disponibles els paquets gridengine-common, gridengine-client, gridengine-exec, gridengine-master, gridengine-qmon i també hi ha el paquet globus-gram-job-manager-setup-sge que està relacionat.
  • :info: LSF. A Debian hi ha disponible el paquet globus-gram-job-manager-setup-lsf que sembla estar relacionat amb aquest gestor de cues.
  • :info: Condor. A Debian hi ha disponible el paquet globus-gram-job-manager-setup-condor que sembla estar relacionat amb aquest gestor de cues.
  • :info: SLURM. Hi ha disponible el paquet slurm i altres paquets addicionals relacionats amb ell.
  • :info: Torque. A Debian hi ha disponibles els paquets torque-common, torque-mom, torque-pam, i torque-server.
  • :fail: LoadLeveler. No sembla estar disponible a Debian.

Requisits especials pels sistemes de gestió de cues:

  • SGE version must be no earlier than 6.0u8. From 6.2u3 on, a patch or SGI reconfiguration is required if SGE preemption is used.

Espai de disc per la instal·lació

Tenint present els requisits,

Disk space requirements for a full installation of Schrödinger software, including the documentation, are given in Table 2.1. These values do not include the PDB or BLAST databases which require 14 GB and 13 GB. The Pfam database (included) requires less than 1 GB. </blockquote Installation Guide. Schrödinger Suite 2012>

L'espai de disc disponible és més del necessari, ja que les bases de dades es poden instal·lar la partició /home,

# df -h
Filesystem            Size  Used Avail Use% Mounted on
...
/dev/sda8             827G  7.6G  777G   1% /home
/dev/sda7              19G  173M   18G   1% /opt

Maestro 9.3 Requirements

Aquest són els requisits específics del programa Maestro v. 9.3,

  • :ok: Targeta gràfica, preferiblement amb OpenGL
  • :ok: An X11R6 X server on any machine to which Maestro is displayed, compatible with XFree86 4.3.0. A Debian, com a molt d'altres distribucions, XFree86 ha estat substituit pel servidor X de XOrg. La versió disponible és la v. 1:7.5+8+squeeze1 procedent de Debian Backports.
  • :ok: X servers must include the GLX OpenGL extension, and OpenGL must be enabled. L'extensió GLX OpenGL i OpenGl estan instal·lats i en funcionament.
  • :ok: fontconfig, in a version compatible with 2.2.1-13. La versió instal·lada és la 2.8.0-2.1.
  • :ok: Firefox web browser for display of online help. Other browsers may be used, but are not guaranteed to work. La versió instal·lada actualment és la 13.0, però sota el nom Iceweasel, tanmateix la comanda firefox és reconeguda i obre aquest Firefox rebatejat.
  • :ok: PDF reader. For Adobe Reader a version no earlier than 7.0.5 is recommended. La versió d'Acrobat Reader disponible és la 9.5.1. A més, hi ha altres visors de PDF disponibles.

Notes sobres els productes

Per ara em salto aquesta secció (2.4 Product Notes), ja que caldrà veure primer quins programes s'instal·len, i perquè molts dels comentarise semblen fer referència a instal·lacions en clusters d'ordinadors, i aquest no és el nostre cas.

Verifying System Compliance

Faig servir la comanda platform per comprovar els requisits del sistema,

# ./platform
 
This looks like a Linux system (glibc 2.11.3), running on x86_64 hardware.
 
The recommended version for this system is: Linux-x86_64
 
These other versions should also work:    Linux-x86

# ./platform -s
 System requirements: perl
 
 Your perl installation is acceptable.

# ./platform -l
OS:            LINUX 3.2.0-0.bpo.2-amd64
Distribution:  Debian GNU/Linux 6.0.5 (squeeze)
CPU:           x86_64
Processor:     Intel(R) Xeon(R) CPU W3550 @ 3.07GHz (1596 MHz)
Processors:    4
Memory:        6111600 kB
Swap:          11717628 kB
perl:          5.010
glibc:         2.11.3

Instal·lació de la Schrödinger Suite

:info: La instal·lació la faig com a usuari root (sudo -s).

Scracth disk

Abans de començar, creo la carpeta /home/scratch per fer-la servir com scratch disk ja que les carpetes que fa servir el programa per defecte no existeixen, i, si es vol fer servir una carpeta alternatia, el programa d'instal·lació no la crea.

./INSTALL

Aquesta és la sessió d'instal·lació del programa amb la comanda “./INSTALL”

Inici

La primera pantalla ens proporciona unes breus instruccions d'ús del programa d'instal·lació,

root@cie-48-184:/home/sermnadmin/Downloads/Schrodinger_Suite2012_Linux-x86_64_NonCommercial# ./INSTALL

                       Schrodinger Software Installer

   Please respond to each question by entering the appropriate response
   or pressing ENTER to accept the default (shown in parentheses).
                                                                                
   You will be given a chance to review all of your installation choices 
   before any files are actually installed.
                                                                                
   You can quit the installation at any time by pressing CTRL+C.

   For more information, see the Installation Guide, which is in the file
   "install_guide.pdf", in the same directory as this INSTALL script.

   Proceed to Schrodinger Suite2012 installation...
 
[Press ENTER to continue]

On instal·lar el programa?

A la pantalla següent, se'ns demana ón instal·lar el programa. Si el directori no existeix, ens pregunta si el volem crear. A GNU/Linux, el Filesystem Hierarchy Standard estableix que les Optional application software packages s'han d'instal·lar a la carpeta /opt, que és la proposada pel programa d'instal·lació,

SCHRODINGER directory 

   Select the directory where you want to install this software.

   This directory will hold your license file, a script to launch each 
   installed product, a subdirectory for each release of each product,
   and any documentation that is installed. To run the software, you
   must set the SCHRODINGER environment variable to this directory.

   It is necessary to install the software for each major release in
   a separate SCHRODINGER directory. If you are installing additional
   products for a release, or upgrading a product to a new version with
   the same major version number, you can install into the same
   SCHRODINGER as the existing software from that release, but software 
   from different major releases should never be mixed.

SCHRODINGER directory:  (/opt/schrodinger) 
That directory doesn't exist yet.  Can I create it? [y/n]  (y) 

    Your SCHRODINGER directory will be /opt/schrodinger.
 
OK? [y/n]  (y) y

Hardware/software platform

El programa d'instal·lació comprova en quin tipus de sistema s'està executant, i recomanda la versió que millor s'ajusta a l'arquitectura i sistema operatiu de l'ordinador,

2) Hardware/software platform
    
   This looks like a Linux system (glibc 2.11.3), running on x86_64 hardware.
    
   The recommended version for this system is: Linux-x86_64
    
   These other versions should also work:    Linux-x86

   You can install products for any platform you like, but only the
   versions listed above will run on the current machine.  Product
   modules that are usable on the current machine will be marked as 
   'compatible' on the module selection screen, which will be displayed 
   next.

   For information on which modules to select for each Schrodinger 
   product, see the Schrodinger Product Installation Guide.

[ Now compiling product installation data... ]
 
[Press ENTER to continue]

Selecció de mòduls

En aquest apartat, el programa d'instal·lació ens permet triar els mòduls que volem instal·lar: tots, cap o alguns. En el nostre cas, només instal·lo els programes pels quals tenim llicència,

3) Module selection

    You now need to select which modules to install, 
    or you can choose to install all available modules.

Install all available modules? [y/n]  (y) n
   The following modules are available for installation:
   
    product        version   platform        status      compatible  action
    -------------  --------  --------------  ----------  ----------  -------
 1) bioluminate    1.0 r023  Linux-x86_64    NEW            yes                
 2) hmmerpfamdb              <database>      NEW            yes                
 3) blastwebdb               <database>      NEW            yes                
 4) alldocs        1.2 r028  <docs>          NEW            yes                
 5) canvas         1.5 r023  Linux-x86_64    NEW            yes                
 6) mcpro          2.9 r023  Linux-x86_64    NEW            yes                
 7) psp            3.1 r024  Linux-x86_64    NEW            yes                
 8) blast                    Linux-x86_64    NEW            yes                
 9) hmmerpfam                Linux-x86_64    NEW            yes                
10) impact         5.8 r023  Linux-x86_64    NEW            yes                
11) jaguar         7.9 r023  Linux-x86_64    NEW            yes                
12) macromodel     9.9 r223  Linux-x86_64    NEW            yes                
13) maestro        9.3 r024  Linux-x86_64    NEW            yes                
14) qikprop        3.5 r023  Linux-x86_64    NEW            yes                
15) combiglide     2.8 r023  Linux-x86_64    NEW            yes                
16) phase          3.4 r023  Linux-x86_64    NEW            yes                
17) epik           2.3 r023  Linux-x86_64    NEW            yes                
18) knime          1.5 r023  Linux-x86_64    NEW            yes                
 
   To select modules for installation, enter the module numbers at 
   the prompt. Enter multiple numbers as a range ("2-5") or separated 
   by commas or spaces ("2,3,4,5"). To clear the selection, enter "none".
   To select all modules, enter "all".

   Modules selected for installation will be marked 'INSTALL'
   in the rightmost column of the modules table.  

Modules to install:  [1-18,all,none]  4,12,13,18

Després d'entrar la llista de mòduls a triats, el programa d'instal·lació torna a mostrar la mateixa pantalla, però amb els mòduls seleccionats ara estan identificats amb “INSTALL” a la columna action. Això permet corregir qualsevol error que hàgim comès. Si estem d'acord amb la tria mostrada en pantalla, només cal prémer ReTURN per confirmar-la i passar a la pàgina següent,

3) Module selection

   The following modules are available for installation:
   
    product        version   platform        status      compatible  action
    -------------  --------  --------------  ----------  ----------  -------
 1) bioluminate    1.0 r023  Linux-x86_64    NEW            yes                
 2) hmmerpfamdb              <database>      NEW            yes                
 3) blastwebdb               <database>      NEW            yes                
 4) alldocs        1.2 r028  <docs>          NEW            yes      INSTALL   
 5) canvas         1.5 r023  Linux-x86_64    NEW            yes                
 6) mcpro          2.9 r023  Linux-x86_64    NEW            yes                
 7) psp            3.1 r024  Linux-x86_64    NEW            yes                
 8) blast                    Linux-x86_64    NEW            yes                
 9) hmmerpfam                Linux-x86_64    NEW            yes                
10) impact         5.8 r023  Linux-x86_64    NEW            yes                
11) jaguar         7.9 r023  Linux-x86_64    NEW            yes                
12) macromodel     9.9 r223  Linux-x86_64    NEW            yes      INSTALL   
13) maestro        9.3 r024  Linux-x86_64    NEW            yes      INSTALL   
14) qikprop        3.5 r023  Linux-x86_64    NEW            yes                
15) combiglide     2.8 r023  Linux-x86_64    NEW            yes                
16) phase          3.4 r023  Linux-x86_64    NEW            yes                
17) epik           2.3 r023  Linux-x86_64    NEW            yes                
18) knime          1.5 r023  Linux-x86_64    NEW            yes      INSTALL   
 
   To select modules for installation, enter the module numbers at 
   the prompt. Enter multiple numbers as a range ("2-5") or separated 
   by commas or spaces ("2,3,4,5"). To clear the selection, enter "none".
   To select all modules, enter "all".

   Modules selected for installation will be marked 'INSTALL'
   in the rightmost column of the modules table.  

   Press ENTER to confirm the selections shown above and proceed to the
   next step, or select additional modules by entering the module numbers.

Modules to install:  [1-18,all,none]    [Enter]

Directori "Scratch"

Aquest és el directori que hem creat més amunt i que està a disposició dels programes de càlcul per guardar fitxers temporals,

*) Scratch directory

   Most Schrodinger programs create temporary job directories for scratch
   files. To get the best performance from these programs, specify a 
   directory where these temporary directories can be created. 

   Ideally, the scratch directory should be on a fast, local disk drive. 
   Many sites provide a special local /scratch partition for such purposes.
   There should be at least 2GB of space available in the scratch directory.

   This installer saves the location of the scratch directory as a tmpdir 
   setting in the hosts file, schrodinger.hosts, which is in your SCHRODINGER 
   directory. If you don't already have a tmpdir setting in this file, or if 
   you don't have a schrodinger.hosts file, the installer creates them for you. 
   The hosts file must contain an entry for each machine on which jobs will be 
   run, specifying where Schrodinger software is installed and which scratch 
   directory should be used on that machine.

   The scratch directory is not used until someone runs a job. If you cannot
   identify an appropriate directory now, you can edit the hosts file and add
   a tmpdir setting later. The scratch directory can be specified at runtime
   by setting the SCHRODINGER_TMPDIR environment variable. See the Schrodinger 
   Product Installation Guide and the product manual for more information.

Scratch directory?  (/scratch)  /home/scratch

Resum de les opcions d'instal·lació

Aquesta pantalla resumeix els mòduls que s'instal·laran i ens demana que confirmem la tria,

*) Installation summary

Your installation choices were:
 
    SCHRODINGER directory:            /opt/schrodinger
    Scratch directory:                /home/scratch
 
    product        version   platform        status      compatible  action
    -------------  --------  --------------  ----------  ----------  -------
    alldocs        1.2 r028  <docs>          NEW            yes      INSTALL   
    macromodel     9.9 r223  Linux-x86_64    NEW            yes      INSTALL   
    maestro        9.3 r024  Linux-x86_64    NEW            yes      INSTALL   
    knime          1.5 r023  Linux-x86_64    NEW            yes      INSTALL   
    mmshare        2.1 r023  Linux-x86_64    NEW            yes      INSTALL   
 
Note: The mmshare module provides common resources for all products.
      It is installed automatically when necessary.
 
Are these choices correct? [y/n]  ()  y

[ Verifying the integrity of the selected installer files... ]

Fitxer 'schrodinger.host'

El pas següent és comprovar el contingut del fitxer schrodinger.host i corregir-lo si cal. En el nostre cas, com que només està previst que fem servir el programa l'ordinador on l'estem instal·lant, els paràmetres per defecte ja s'ajusten a la configuració final,

*) Configuring your schrodinger.host file

    Finally, to be able to submit jobs to remote machines, or to a batch
    queue, you will need to configure the "hosts file",
           
        $SCHRODINGER/schrodinger.hosts

    following the instructions in section 6.1 of the Installation Guide.
        
    The entries in this file correspond to individual remote hosts or
    batch queues.  Each entry can be as simple as the name of a remote
    machine; it can also specify an alternate software installation or
    scratch directory to use on that machine.  Batch queue entries must
    specify the batch system used and any special arguments that need
    to be given when a job is submitted to the queue.

    After you've configured your hosts file, please remember to

                   **********************************
                   **   CHECK YOUR INSTALLATION!   **
                   **********************************

    The 'installation_check' script will check the hosts file for
    common errors and run a quick test job for each entry.  To run it,
    execute the following command, after first making sure the environment
    variable SCHRODINGER is set to /opt/schrodinger :

        $SCHRODINGER/installation_check
    
    We strongly recommend that you run this script after making changes
    to your hosts file.  

[Press ENTER to continue]

La configuració emmagatzemada al fitxer /opt/schrodinger/schrodinger.hosts és,

# Schrodinger hosts file
#
# The hosts file consists of a series of entries describing each
# 'host' (machine) on which jobs can be run.
# 
# [...]
#
# If you need create a personalized version, copy this file to your 
# ~/.schrodinger directory or to the job directory and modify that copy.
#
#######################################################################
# Note: The 'localhost' entry is special.  It is used for jobs that
#       are run without specifying a host.  Also, settings made in the
#       'localhost' entry are implicitly included in every other host
#       entry as well, so common settings (like 'schrodinger:') should
#       be made there.  
#######################################################################

#
name:        localhost
schrodinger: /opt/schrodinger
tmpdir:      /home/scratch 

Els paràmetres que potser caldrà modificar en funció de quin ús fem del programa són,

  • name - si s'envien jobs des d'altrs ordinadors caldrà posar el nom real de l'ordinador (el definitiu a la xarxa interna del SeRMN).
  • processors - a les instruccions d'instal·lació no queda clar si fa referència al nombre de CPU o al nombre de cores dins una CPU. Per ara deixo el valor per defecte.

Licensing

En aquesta pantalla apareix la informació necessària (machine name, host id) per sol·licitar la llicència.

*) Licensing

    You will need one or more licenses before you can run the
    software you have just installed.

    Please note the following information, which you will need in
    order to generate a license key:

Machine name:  cie-48-184.uab.es
Host ID: 082e5f1dee86

    If you are not performing this installation on your license
    server, you will need the output of:

    $SCHRODINGER/machid -hostid

    from your license server instead of the output above.

    Then, visit the following web page for instructions on obtaining
    your license:

    http://www.schrodinger.com/licensing
   
[Press ENTER to continue]

Finalment... la instal·lació

Després de prémer el botó ENTER a la pantalla anterior, comença el llarg procés d'instal·lar tots els programes… i mig segon després ens diu que ja ha acabat:

           ***** Schrodinger software installation is complete. *****
       
root@cie-48-184:/home/sermnadmin/Downloads/Schrodinger_Suite2012_Linux-x86_64_NonCommercial# 

Per ara, l'únic que podem fer és esperar que ens enviïn el fitxer de llicències. Llavors el podrem instal·lar i comprovar el funcionament dels programes instal·lats.

Espai de disc ocupat

Un cop finalitzada la instal·lació, el programa ocupa ocupa 3,6 GiB (carpeta /opt/schrodinger), que es reparteixen majoritàriament entre,

  • 217 MiB ./docs
  • 1240 MiB ./knime-v15023
  • 359 MiB ./macromodel-v99223
  • 252 MiB ./maestro-v93024
  • 1585 MiB ./mmshare-v21023

Instal·lació i activació de la llicència

Aquest és el contingut del correu electrònic amb la llicència i instruccions per instal·lar-la. Per motius de seguretat, els noms de persones han estat substituïts per inicials, i les dades de la llicència han estat eliminades. També he esborrat la part relativa a clústers d'ordinadors perquè no en tenim cap.

Thank you for your purchase, K.D. has asked us to make the end date 1 year from today.

Attached and listed below are the license files which will enable access to 1 job of MacroModel with Confgen as well as access to KNIME and Maestro. These licenses are served from your new Linux machine called cie-48-184.uab.es and are valid through 12-Jun-2013.

To activate these, replace the current “license” file found in the $SCHRODINGER/license directory on cie-48-184 with the attached license file and issue the command:

$SCHRODINGER/licadmin START -c $SCHRODINGER/license -l lmgrd.`hostname`.log

(not wrapped and exactly as shown) on cie-48-184 to activate the license server daemon.

Once the licenser server is active you should have no problems running the Schrodinger products.

If you encounter any errors please use the 2012 Diagnostics Tool. To run the diagnostics tool please enter $SCHRODINGER/diagnostics in a terminal window.

If the license server is on a remote machine and you are encountering errors, you should run the following five steps on both the license server and on your local machine:

First - Open a terminal window.

Second - Set the SCHRODINGER environment variable to point to your software installation.

Third - Enter the command $SCHRODINGER/licadmin INFO.

When the licadmin program finishes, it prints a message telling you the name of the file it created. The name is in the form username-machine-license-info.tar.gz. This file should be in the current directory.

Fourth - Rename the file to username-machine-license-info.tarball. This is necessary because some mail programs filter out files with a .tar.gz extension.

Finally - Send the renamed file to help@schrodinger.com.

If you have other questions or problems please see our online knowledge base at: http://www.schrodinger.com/kb/ and type 2012 Linux in the search box.

If there is anything else we can do for you please let us know.

Sincerely,

Kimberly Lehmann

Please send only license requests to licensing@schrodinger.com. All other questions or queries should go to help@schrodinger.com. Thank you.

# Date generated: <Tue Jun 12 14:51:41 PDT 2012> # Server flexid: … # …


Schrodinger Licensing | licensing@schrodinger.com http://www.schrodinger.com | 503-299-1150 | 503-299-4532 (fax) 101 SW Main Street, Suite 1300, Portland, OR 97204


      Find answers in our searchable Knowledge Base!
             http://www.schrodinger.com/kb/

———————————————————————-

License Installation Instructions

The instructions below assume that the SCHRODINGER environment variable has been set to the directory where you have installed the software.

Editing the license file

1. Add the license information that was sent to you to the end of your $SCHRODINGER/license file. If your license file contains any SERVER lines, then a copy of, or symbolic link to, the license file must be placed in the $SCHRODINGER directory of each machine that is listed on a SERVER line.

2. Close and save the changes to the license file. Please ensure that the license file has the appropriate read permissions.

3. If your license file does not contain a SERVER line, and does not have any FEATURE or INCREMENT sections specifying HOSTID=INTERNET=, then your license installation is complete.

If your license file does not contain a SERVER line, but *does* have FEATURE or INCREMENT sections specifying HOSTID=INTERNET=, you will need to place a copy of (or symbolic link to) the license file in the $SCHRODINGER directory of your other machines (that fall in the IP address range specified by the OSTID=INTERNET= lines). This will allow those machines to access these features.

4. If your license file *does* contain a SERVER line, you will need to either start the Schrodinger-installed license server daemon for the first time, or make the currently-running copy of the Schrodinger-installed license server daemon reread the license file.

If you are installing the license information for the first time, and have not previously started the license server daemon using the licensing software installed with your Schrodinger software, please proceed to the section titled “Starting the license server daemon”.

If you edit the license file after having already started the license server daemon (lmgrd) using the Schrodinger-installed licensing software, you will need to tell lmgrd to reread the updated license file. This is usually the case if you have added additional license lines to your file that already contained license information. In this case, please proceed to the section titled “Rereading the license file”.

If you encounter any problems, please see the Troubleshooting sectionbelow.

Rereading the license file

You can instruct an already-running instance of the Schrodinger-installed license server daemon to reread the license file by executing the following command:

$SCHRODINGER/licadmin REREAD

Please execute this command each time you add new lines to the license file and wish to have the updated license information read by an already-running copy of the license server daemon.

After executing a reread, you may want to check the current status of available licenses with the following command:

$SCHRODINGER/licadmin STAT

Starting the license server daemon (lmgrd)

1. Before starting the license server daemon, you should set your FLEXLM_DIAGNOSTICS environment variable to 3, which will provide the highest level of license debugging output. This additional output can be used to troubleshoot any problems you may experience with starting the license server.

For bash or ksh, FLEXLM_DIAGNOSTICS can be set with the following command:

export FLEXLM_DIAGNOSTICS=3

For csh, FLEXLM_DIAGNOSTICS can be set with the following command:

setenv FLEXLM_DIAGNOSTICS 3

(* Once you've verified that the license server has started and everything is working correctly, you can unset your FLEXLM_DIAGNOSTICS environment variable if you wish. This may be desirable if you have other software running which also uses FLEXlm, as they will also produce additional debugging output as long as this environment variable is set.)

2. If your license file contains a SERVER line, and you have not already previously started the license server, then execute the command:

$SCHRODINGER/licadmin START -c $SCHRODINGER/license -l lmgrd.`hostname`.log

(exactly as shown). This command will start lmgrd, the license server daemon. lmgrd will listen for license requests on the port designated by the third argument after the word SERVER on the SERVER line of the license file.

For example, in the following SERVER line:

SERVER lsnode b0019732 27000

27000 is the port on which the machine lsnode will listen for license requests.

If no port is specified on the SERVER line, a default port in the range 27000-27009 is used.

3. Available command-line arguments for the licadmin utility may be viewed with the command:

$SCHRODINGER/licadmin HELP

Setting up client machines

1. To allow client machines to access license information from the license server, the LM_LICENSE_FILE environment variable must be set appropriately on the client machines. The LM_LICENSE_FILE environment variable tells the client machine where to look in order to obtain a license. In addition, setting your FLEXLM_DIAGNOSTICS variable to 3 will provide the highest level of license debugging output, for use in troubleshooting license checkout problems.

For bash or ksh, FLEXLM_DIAGNOSTICS can be set with:

export FLEXLM_DIAGNOSTICS=3

For csh, FLEXLM_DIAGNOSTICS can be set with:

setenv FLEXLM_DIAGNOSTICS 3

Before attempting to set the LM_LICENSE_FILE variable, please check whether it has already been set to a particular value by executing the command:

echo $LM_LICENSE_FILE

If the command above returns no output, then the LM_LICENSE_FILE variable has not yet been set.

If the LM_LICENSE_FILE environment variable has not been set, it can be set as follows:

For bash or ksh, LM_LICENSE_FILE can be set with the following command:

export LM_LICENSE_FILE=[port]@<host>

For csh, LM_LICENSE_FILE can be set with the following command:

setenv LM_LICENSE_FILE [port]@<host>

If the echo $LM_LICENSE_FILE command shows that the LM_LICENSE_FILE environment variable has already been set, then new values can be appended with the following commands:

For bash or ksh, a new value can be appended to LM_LICENSE_FILE with the following command:

export LM_LICENSE_FILE=[port]@<host>:$LM_LICENSE_FILE

For csh, a new value can be appended to LM_LICENSE_FILE with the following command:

setenv LM_LICENSE_FILE [port]@<host>:$LM_LICENSE_FILE

In all the commands above, replace <host> with the hostname of the machine on which lmgrd is running (the license server). Replace [port] with the port number that is specified as the third argument after the word SERVER on the SERVER line of the license file. If no port is specified on the SERVER line, or if the port specified is in the default range of 27000-27009, then the value for [port] may be omitted when specifying LM_LICENSE_FILE.

Enabling license communication across a firewall or proxy

If the client machine and the license server are separated by a firewall or proxy, it will probably be necessary to specify a port on the VENDOR line of the license in order to enable license communication. Any unused port may be chosen, but the port specified will need to be made available on the firewall or proxy. For example, if the license file looks like the following:

SERVER lsnode b0019732 27000
VENDOR SCHROD PORT=10081

and the client machine and license server are separated by a firewall or proxy, then ports 27000 and 10081 will need to be made available to the client.

Configuració

El pas següent és configurar el sistema i els comptes dels usuaris per tal que puguin cridar i executar correctament els programes instal·lats.

Variables d'entorn

Variables de entorn,

  • Afegeixo la carpeta on està instal·lat el programa a la variable PATH.
  • Per ara no faig ús d'alies, potser caldrà més endavant quan instal·lem altres versions.
  • Per ara no defineixo PYTHONPATH ni SCHRODINGER_PYTHONPATH
  • Per ara no defineixo PYMOLMAESTRO
  • Defineixo SCHRODINGER_HELP_BROWSER perquè faci servir Iceweasel (aka Mozilla Firefox).

Per simplicitat, creo a /etc/profile.d els fitxers schrodinger.sh,

# schrodinger.sh - created by MCE for SCHRODINGER SUITE 2012
PATH=/opt/schrodinger:$PATH
export SCHRODINGER=/opt/schrodinger
# export PYTHONPATH=
# export SCHRODINGER_PYTHONPATH=
# export PYMOLMAESTRO=
export SCHRODINGER_HELP_BROWSER=/usr/bin/firefox
export SCHRODINGER_PDF_VIEWER=/usr/bin/acroread

i schrodinger.csh

# schrodinger.csh - created by MCE for SCHRODINGER SUITE 2012
setenv PATH /opt/schrodinger:${PATH}
setenv SCHRODINGER /opt/schrodinger
# setenv PYTHONPATH 
# setenv SCHRODINGER_PYTHONPATH 
# setenv PYMOLMAESTRO 
setenv SCHRODINGER_HELP_BROWSER /usr/bin/firefox
setenv SCHRODINGER_PDF_VIEWER /usr/bin/acroread

Testing the installation

# /opt/schrodinger/run installation_check.pl 
------------------------------------------------------------------------
                Schrodinger installation check (rev 1.31)
------------------------------------------------------------------------

Test files will be written in directory instcheck-cie-48-184-4fdb5e50/.

Hosts file: /opt/schrodinger/schrodinger.hosts

There is only 1 host entry in this file.
* There are NO host entries for running immediate jobs on remote machines.
* There are NO host entries for submitting batch jobs.


------------------------------------------------------------------------------------------
                          Schrodinger Installation Check (rev 1.31)
------------------------------------------------------------------------------------------

Hosts file: /opt/schrodinger/schrodinger.hosts

        ******    No test jobs were run.  Use the '-test' option to run   ******
        ******    a quick test job on selected hosts, or '-testall' to    ******
        ******    run jobs on all hosts.                                  ******

------------------ -------------------- -------  -----------------------------------------
Hosts Entry        Check                Result   Notes
------------------ -------------------- -------  -----------------------------------------
localhost          hosts file           * OK *   
------------------------------------------------------------------------------------------

This table can also be found in the file instcheck-cie-48-184-4fdb5e50.summary .
See that file for additional comments on any issues identified above.

The output files and other results of these tests have been archived in the
following file:
...
# /opt/schrodinger/run installation_check.pl -test localhost
------------------------------------------------------------------------
                Schrodinger installation check (rev 1.31)
------------------------------------------------------------------------

Test files will be written in directory instcheck-cie-48-184-4fdb5f04/.

Hosts file: /opt/schrodinger/schrodinger.hosts

There is only 1 host entry in this file.
* There are NO host entries for running immediate jobs on remote machines.
* There are NO host entries for submitting batch jobs.

1 test job will be launched.

Progress will be logged in instcheck-cie-48-184-4fdb5f04/inst_check.log

This may take 15 minutes or more - please be patient.
A summary of the results will be given when all jobs are done.

------------------------------------------------------------------------------------------
                          Schrodinger Installation Check (rev 1.31)
------------------------------------------------------------------------------------------

Hosts file: /opt/schrodinger/schrodinger.hosts

------------------ -------------------- -------  -----------------------------------------
Hosts Entry        Check                Result   Notes
------------------ -------------------- -------  -----------------------------------------
localhost          testapp              * OK *   
------------------------------------------------------------------------------------------

This table can also be found in the file instcheck-cie-48-184-4fdb5f04.summary .
See that file for additional comments on any issues identified above.

The output files and other results of these tests have been archived in the
following file:

Archive: instcheck-cie-48-184-4fdb5f04.tarball

If you need help understanding any of these results, please send 
this file to help@schrodinger.com, along with your questions. 


Done.

Gestor de cues

Això no és immediat, però si algun dia féssim servir molt i molt el Macromodel i altres programes de càlcul, no tindríem més remei que emprar un gestor de cues (veure "Queueing systems" més amunt) per organitzar les peticions de càlculs.

Mentre arriba aquest dia, aquesta és una recopilació d'enllaços d'interés per familiartizar-se amb els gestors de cues. Per ara, no segueixen cap ordre.

Debian for chemists

Mentre buscava enllaços per l'apartat anterior, he començat a trobar d'altres sobre Debian per químics i, per mandra d'obrir una pàgina nova, els he acabat recopilant en aquesta pàgina, però aquesta és una situació transitòria ;-)

Running Maestro

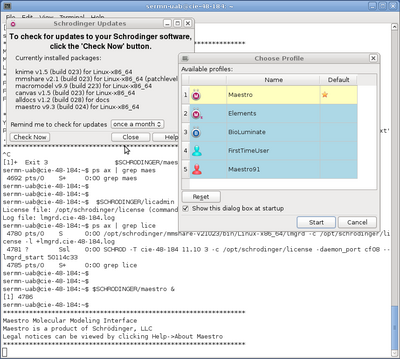
Després d'un primer missatge d'error, la consulta al Schrodinger Knowledge Base m'indica que el gestor de llicències no està funcionant. El poso en marxa,

sermn-uab@cie-48-184:~$  $SCHRODINGER/licadmin START -c $SCHRODINGER/license -l lmgrd.`hostname`.log 
License file: /opt/schrodinger/license (commandline)
Log file: lmgrd.cie-48-184.log
sermn-uab@cie-48-184:~$ ps ax | grep lice
 4780 pts/0    S      0:00 /opt/schrodinger/mmshare-v21023/bin/Linux-x86_64/lmgrd -c /opt/schrodinger/license -l +lmgrd.cie-48-184.log
 4781 ?        Ssl    0:00 SCHROD -T cie-48-184 11.10 3 -c /opt/schrodinger/license -daemon_port cf08 --lmgrd_start 50114c33
 4785 pts/0    S+     0:00 grep lice

i provo a executar el programa Maestro

sermn-uab@cie-48-184:~$ $SCHRODINGER/maestro &

i s'obren les primeres finestres del programa,  Schrodinger Maestro opens!

Caldrà comprovar perquè el gestor de llicències no s'ha posat en marxa automàticament. Per ara, sembla ser que no hi ha cap script a /etc/init.d que s'encarregui de posar-lo en marxa en reiniciar l'ordinador.

Per començar trio el perfil per defecte: Maestro i finalment s'obre la finestra principal del programa.

This website uses cookies. By using the website, you agree with storing cookies on your computer. Also you acknowledge that you have read and understand our Privacy Policy. If you do not agree leave the website.More information about cookies
informatica/hp_z400_macromodel_macromodel.txt · Last modified: 2020/07/09 12:22 by miquel